Keepalived & HAProxy를 이용하여 Nginx H/A, Load Balancing환경구성을 만들어보자.
기능 이해를 돕기 위하여 두 스텝으로 나누어 아키텍처 구성을 해본다.
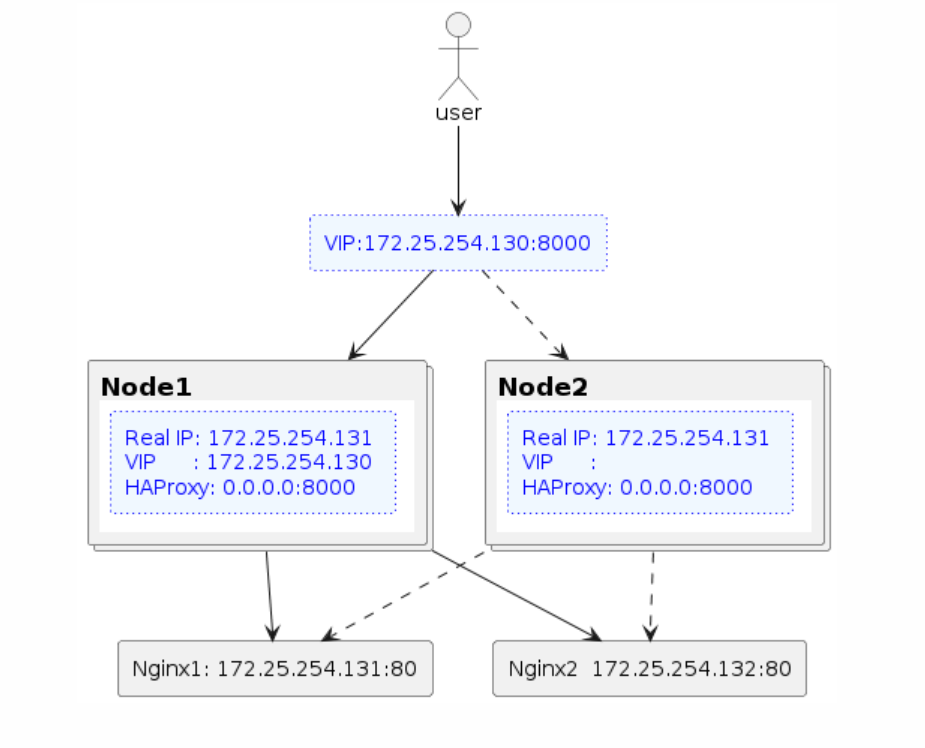
1단계에서는 Nginx + Keepalived로 HA구성(Active-Passive), 2단계에서 HAProxy를 보완하는 방식으로 Active-Active구성을 만들어보자.
설치환경
OS: Ubuntu 22.04.4 LTS
Nginx: 1.18.0
Keepalived: v2.2.4
HAProxy: 2.4.24
| No. | host name | IP | node roles |
|---|---|---|---|
| #1 | svr1 | 172.25.254.131 | Keepalived(master), Nginx, HAProxy |
| #2 | svr2 | 172.25.254.132 | Keepalived(backup), Nginx, HAProxy |
Keepalived를 이용한 Active-passive환경 구성하기
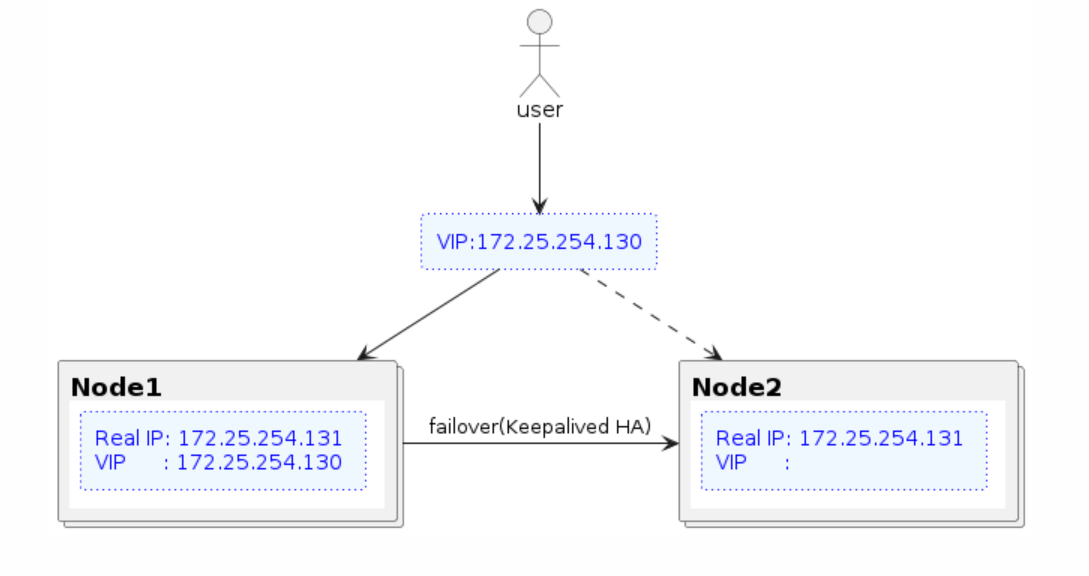
1단계에서는 아래와 같은 서버 구성을 만들어보자. 사용자는 VIP를 통하여 nginx에 접속을 하게되며 #1번 서버가 장애발생시 VIP가 #2번 서버로 넘어가는 구조다.

설치
1
2
3
sudo apt-get update
sudo apt-get install keepalived
sudo apt-get install nginx
두대의 서버에서 각각 아래와 같이 Keepalived 구성파일 keepalived.conf 편집
#1번 서버
1
sudo vim /etc/keepalived/keepalived.conf
1
2
3
4
5
6
7
8
9
10
11
12
13
14
15
16
17
18
19
20
21
22
23
24
25
26
27
28
29
30
31
32
33
34
35
36
37
38
39
40
41
42
43
44
45
46
global_defs {
  router_id nginx
}

# nginx running여부 체크 스크립트
vrrp_script check_nginx {
  script "/etc/keepalived/check_nginx.sh"
  interval 2
  weight 50
}

vrrp_instance VI_1 {
    # instance 초기화 상태 (MASTER or BACKUP)
    state MASTER
    # vrrp를 적용할 네트웍 인터페이스
    interface ens33
 	# 가상 라우터ID (0-255),tcpdump vrrp명령을 통하여 확인가능(vrid)
    virtual_router_id 62
    # 우선순위, MASTER노드의 값은 BACKUP노드보다 크게 설정
    priority 151
    # vrrp패킷 송신간격(단위:초)
    advert_int 1
    # BACKUP state에서만 먹히는 옵션으로 (NOTE: For this to work, the initial state must not be MASTER.),
    # priority가 높은 node가 VIP를 자동으로 빼았기를 원하지 않을떄 모든 instance상태를 BACKUP으로 설정후 해당옵션 적용하면 됨.
    nopreempt
    # 본인IP
    unicast_src_ip 172.25.254.131
     # 피어노드IP
    unicast_peer {
        172.25.254.132
    }
    # master, backup 동일값으로 설정
    authentication {
        auth_type PASS
        auth_pass 1111
    }
    # 가상IP
    virtual_ipaddress {
        172.25.254.130
    }
    # 서비스 점검 스크립트
    track_script {
        check_nginx
    }
}
#2번 서버
1
sudo vim /etc/keepalived/keepalived.conf
1
2
3
4
5
6
7
8
9
10
11
12
13
14
15
16
17
18
19
20
21
22
23
24
25
26
27
28
29
30
31
32
33
34
35
36
37
38
39
40
41
42
43
44
45
46
global_defs {
  router_id nginx
}

# nginx running여부 체크 스크립트
vrrp_script check_nginx {
  script "/etc/keepalived/check_nginx.sh"
  interval 2
  weight 50
}

vrrp_instance VI_1 {
    # instance 초기화 상태 (MASTER or BACKUP)
    state BACKUP
    # vrrp를 적용할 네트웍 인터페이스
    interface ens33
    # 가상 라우터ID (0-255),tcpdump vrrp명령을 통하여 확인가능(vrid)
    virtual_router_id 62
    # 우선순위, MASTER노드의 값은 BACKUP노드보다 크게 설정
    priority 150
    # vrrp패킷 송신간격(단위:초)
    advert_int 1
    #  BACKUP state에서만 먹히는 옵션으로 (NOTE: For this to work, the initial state must not be MASTER.),
    # priority가 높은 node가 VIP를 자동으로 빼았기를 원하지 않을떄 모든 instance상태를 BACKUP으로 설정후 해당옵션 적용하면 됨.
    nopreempt
    # 본인IP
    unicast_src_ip 172.25.254.132
     # 피어노드IP
    unicast_peer {
        172.25.254.131
    }
    # master, backup 동일값으로 설정
    authentication {
        auth_type PASS
        auth_pass 1111
    }
    # 가상IP
    virtual_ipaddress {
        172.25.254.130
    }
    # 서비스 점검 스크립트
    track_script {
        check_nginx
    }
}
두대의 서버에서 각각 nginx 상태체크 스크립트 생성
1
sudo vim /etc/keepalived/check_nginx.sh
1
2
3
4
5
#!/bin/sh
if [ -z "`/usr/bin/pidof nginx`" ]; then
  systemctl stop keepalived
  exit 1
fi
실행권한 부여:
1
sudo chmod +x /etc/keepalived/check_nginx.sh
서비스 구동
nginx구동 및 구동상태 체크
1
2
sudo systemctl start nginx
systemctl status nginx
1
2
3
4
5
6
7
8
9
10
11
12
13
14
15
16
17
● nginx.service - A high performance web server and a reverse proxy server
     Loaded: loaded (/lib/systemd/system/nginx.service; enabled; vendor preset: enabled)
     Active: active (running) since Tue 2024-05-07 07:22:43 UTC; 37s ago
       Docs: man:nginx(8)
    Process: 205677 ExecStartPre=/usr/sbin/nginx -t -q -g daemon on; master_process on; (code=exited, status=0/SUCCESS)
    Process: 205678 ExecStart=/usr/sbin/nginx -g daemon on; master_process on; (code=exited, status=0/SUCCESS)
   Main PID: 205679 (nginx)
      Tasks: 3 (limit: 4515)
     Memory: 3.3M
        CPU: 52ms
     CGroup: /system.slice/nginx.service
             ├─205679 "nginx: master process /usr/sbin/nginx -g daemon on; master_process on;"
             ├─205680 "nginx: worker process" "" "" "" "" "" "" "" "" "" "" "" "" "" "" "" "" "" "" "" "" "" "" "" "" "" "" ""
             └─205681 "nginx: worker process" "" "" "" "" "" "" "" "" "" "" "" "" "" "" "" "" "" "" "" "" "" "" "" "" "" "" ""

May 07 07:22:43 svr1 systemd[1]: Starting A high performance web server and a reverse proxy server...
May 07 07:22:43 svr1 systemd[1]: Started A high performance web server and a reverse proxy server.
keepalived구동 및 구동상태 체크
1
2
sudo systemctl start keepalived
systemctl status keepalived
1
2
3
4
5
6
7
8
9
10
11
12
13
14
15
16
17
18
19
20
21
● keepalived.service - Keepalive Daemon (LVS and VRRP)
     Loaded: loaded (/lib/systemd/system/keepalived.service; enabled; vendor preset: enabled)
     Active: active (running) since Tue 2024-05-07 07:25:20 UTC; 18s ago
   Main PID: 205688 (keepalived)
      Tasks: 2 (limit: 4515)
     Memory: 2.0M
        CPU: 265ms
     CGroup: /system.slice/keepalived.service
             ├─205688 /usr/sbin/keepalived --dont-fork
             └─205689 /usr/sbin/keepalived --dont-fork

May 07 07:25:20 svr1 Keepalived[205688]: Starting VRRP child process, pid=205689
May 07 07:25:20 svr1 systemd[1]: keepalived.service: Got notification message from PID 205689, but reception only permitted for main PID 205688
May 07 07:25:20 svr1 Keepalived_vrrp[205689]: WARNING - default user 'keepalived_script' for script execution does not exist - please create.
May 07 07:25:20 svr1 Keepalived_vrrp[205689]: SECURITY VIOLATION - scripts are being executed but script_security not enabled.
May 07 07:25:20 svr1 Keepalived[205688]: Startup complete
May 07 07:25:20 svr1 systemd[1]: Started Keepalive Daemon (LVS and VRRP).
May 07 07:25:20 svr1 Keepalived_vrrp[205689]: (VI_1) Entering BACKUP STATE (init)
May 07 07:25:20 svr1 Keepalived_vrrp[205689]: VRRP_Script(check_nginx) succeeded
May 07 07:25:20 svr1 Keepalived_vrrp[205689]: (VI_1) Changing effective priority from 101 to 151
May 07 07:25:24 svr1 Keepalived_vrrp[205689]: (VI_1) Entering MASTER STATE
Keepalived구동후 Master노드에서 VIP확인
#1번 서버(master)
VIP 확인가능
1
ip addr
1
2
3
4
5
6
7
8
9
10
11
12
13
14
15
1: lo: <LOOPBACK,UP,LOWER_UP> mtu 65536 qdisc noqueue state UNKNOWN group default qlen 1000
    link/loopback 00:00:00:00:00:00 brd 00:00:00:00:00:00
    inet 127.0.0.1/8 scope host lo
       valid_lft forever preferred_lft forever
    inet6 ::1/128 scope host
       valid_lft forever preferred_lft forever
2: ens33: <BROADCAST,MULTICAST,UP,LOWER_UP> mtu 1500 qdisc fq_codel state UP group default qlen 1000
    link/ether 00:0c:29:a1:d7:ea brd ff:ff:ff:ff:ff:ff
    altname enp2s1
    inet 172.25.254.131/24 brd 172.25.254.255 scope global ens33
       valid_lft forever preferred_lft forever
    inet 172.25.254.130/32 scope global ens33
       valid_lft forever preferred_lft forever
    inet6 fe80::20c:29ff:fea1:d7ea/64 scope link
       valid_lft forever preferred_lft forever
#2번 서버(backup)
1
ip addr
1
2
3
4
5
6
7
8
9
10
11
12
13
1: lo: <LOOPBACK,UP,LOWER_UP> mtu 65536 qdisc noqueue state UNKNOWN group default qlen 1000
    link/loopback 00:00:00:00:00:00 brd 00:00:00:00:00:00
    inet 127.0.0.1/8 scope host lo
       valid_lft forever preferred_lft forever
    inet6 ::1/128 scope host
       valid_lft forever preferred_lft forever
2: ens33: <BROADCAST,MULTICAST,UP,LOWER_UP> mtu 1500 qdisc fq_codel state UP group default qlen 1000
    link/ether 00:0c:29:5c:c4:91 brd ff:ff:ff:ff:ff:ff
    altname enp2s1
    inet 172.25.254.132/24 brd 172.25.254.255 scope global ens33
       valid_lft forever preferred_lft forever
    inet6 fe80::20c:29ff:fe5c:c491/64 scope link
       valid_lft forever preferred_lft forever
Failover 테스트
Failover테스트를 위하여 master노드의 nginx를 내려보자
1
sudo systemctl stop nginx
VIP가 #2번 서버로 넘어간것을 확인가능하다.
#1번 서버(master)
1
ip addr
1
2
3
4
5
6
7
8
9
10
11
12
13
14
1: lo: <LOOPBACK,UP,LOWER_UP> mtu 65536 qdisc noqueue state UNKNOWN group default qlen 1000
    link/loopback 00:00:00:00:00:00 brd 00:00:00:00:00:00
    inet 127.0.0.1/8 scope host lo
       valid_lft forever preferred_lft forever
    inet6 ::1/128 scope host
       valid_lft forever preferred_lft forever
2: ens33: <BROADCAST,MULTICAST,UP,LOWER_UP> mtu 1500 qdisc fq_codel state UP group default qlen 1000
    link/ether 00:0c:29:a1:d7:ea brd ff:ff:ff:ff:ff:ff
    altname enp2s1
    inet 172.25.254.131/24 brd 172.25.254.255 scope global ens33
       valid_lft forever preferred_lft forever
    inet6 fe80::20c:29ff:fea1:d7ea/64 scope link
       valid_lft forever preferred_lft forever
#2번 서버(backup)
1
ip addr
1
2
3
4
5
6
7
8
9
10
11
12
13
14
15
1: lo: <LOOPBACK,UP,LOWER_UP> mtu 65536 qdisc noqueue state UNKNOWN group default qlen 1000
    link/loopback 00:00:00:00:00:00 brd 00:00:00:00:00:00
    inet 127.0.0.1/8 scope host lo
       valid_lft forever preferred_lft forever
    inet6 ::1/128 scope host
       valid_lft forever preferred_lft forever
2: ens33: <BROADCAST,MULTICAST,UP,LOWER_UP> mtu 1500 qdisc fq_codel state UP group default qlen 1000
    link/ether 00:0c:29:5c:c4:91 brd ff:ff:ff:ff:ff:ff
    altname enp2s1
    inet 172.25.254.132/24 brd 172.25.254.255 scope global ens33
       valid_lft forever preferred_lft forever
    inet 172.25.254.130/32 scope global ens33
       valid_lft forever preferred_lft forever
    inet6 fe80::20c:29ff:fe5c:c491/64 scope link
       valid_lft forever preferred_lft forever
아래와 같이 master노드의 nginx를 내린후 failover가 정상적으로 수행된것을 확인할수 있다.

Keepalived & HAProxy를 이용한 Load Balancing환경(Active-Active) 구성하기
1단계 구성에 HAProxy를 얹어 로드밸런싱 기능을 구현해보자.

두대의 서버에 각각 HAProxy설치
1
sudo apt-get install haproxy
HAProxy 구성파일 편집:
1
sudo vim /etc/haproxy/haproxy.cfg
1
2
3
4
5
6
7
8
9
10
11
12
13
14
15
16
17
18
19
20
21
22
23
24
25
26
27
28
29
30
31
32
33
34
35
36
37
38
39
40
41
42
43
44
45
46
47
48
49
50
51
52
53
global
        log /dev/log    local0 info
        log /dev/log    local1 warning
        chroot /var/lib/haproxy
        stats socket /run/haproxy/admin.sock mode 660 level admin expose-fd listeners
        stats timeout 30s
        user haproxy
        group haproxy
        daemon

        # ulimit -n값을 디폴트로 하며 해당값의 제한을 받는다.
        # 매개의 connection이 32 KB 메모리를 사용한는것으로 생각하고 적절한 수치를 산정, 필요한 메모리를 할당해주자.
        maxconn 60000

        # Default SSL material locations
        ca-base /etc/ssl/certs
        crt-base /etc/ssl/private

        # See: https://ssl-config.mozilla.org/#server=haproxy&server-version=2.0.3&config=intermediate
        ssl-default-bind-ciphers ECDHE-ECDSA-AES128-GCM-SHA256:ECDHE-RSA-AES128-GCM-SHA256:ECDHE-ECDSA-AES256-GCM-SHA384:ECDHE-RSA-AES256-GCM-SHA384:ECDHE-ECDSA-CHACHA20-POLY1305:ECDHE-RSA-CHACHA20-POLY1305:DHE-RSA-AES128-GCM-SHA256:DHE-RSA-AES256-GCM-SHA384
        ssl-default-bind-ciphersuites TLS_AES_128_GCM_SHA256:TLS_AES_256_GCM_SHA384:TLS_CHACHA20_POLY1305_SHA256
        ssl-default-bind-options ssl-min-ver TLSv1.2 no-tls-tickets

defaults
        log     global
        mode    http
        option  httplog
        option  dontlognull
        retries 3
        timeout http-request 10s
        timeout connect 3s
        timeout client  10s
        timeout server  10s
        timeout http-keep-alive 10s
        timeout check           2s
        errorfile 400 /etc/haproxy/errors/400.http
        errorfile 403 /etc/haproxy/errors/403.http
        errorfile 408 /etc/haproxy/errors/408.http
        errorfile 500 /etc/haproxy/errors/500.http
        errorfile 502 /etc/haproxy/errors/502.http
        errorfile 503 /etc/haproxy/errors/503.http
        errorfile 504 /etc/haproxy/errors/504.http

frontend http-in
    bind *:8000
    maxconn 20000
    default_backend servers

backend servers
    balance roundrobin
    server server1 172.25.254.131:80 check
    server server2 172.25.254.132:80 check
load balancing & HA 테스트
1
while sleep 1 ; do curl http://172.25.254.130:8000 ; done
